
Traffic control signs ensure safety on roads by guiding, warning, and regulating traffic for drivers, pedestrians, and cyclists. Proper installation is mandatory, especially with the updated MUTCD 11th Edition standards, effective January 18, 2024. Compliance becomes mandatory by January 18, 2026, for all public and private roads open to public travel. Incorrect installation can lead to safety risks, reduced visibility, and legal issues.
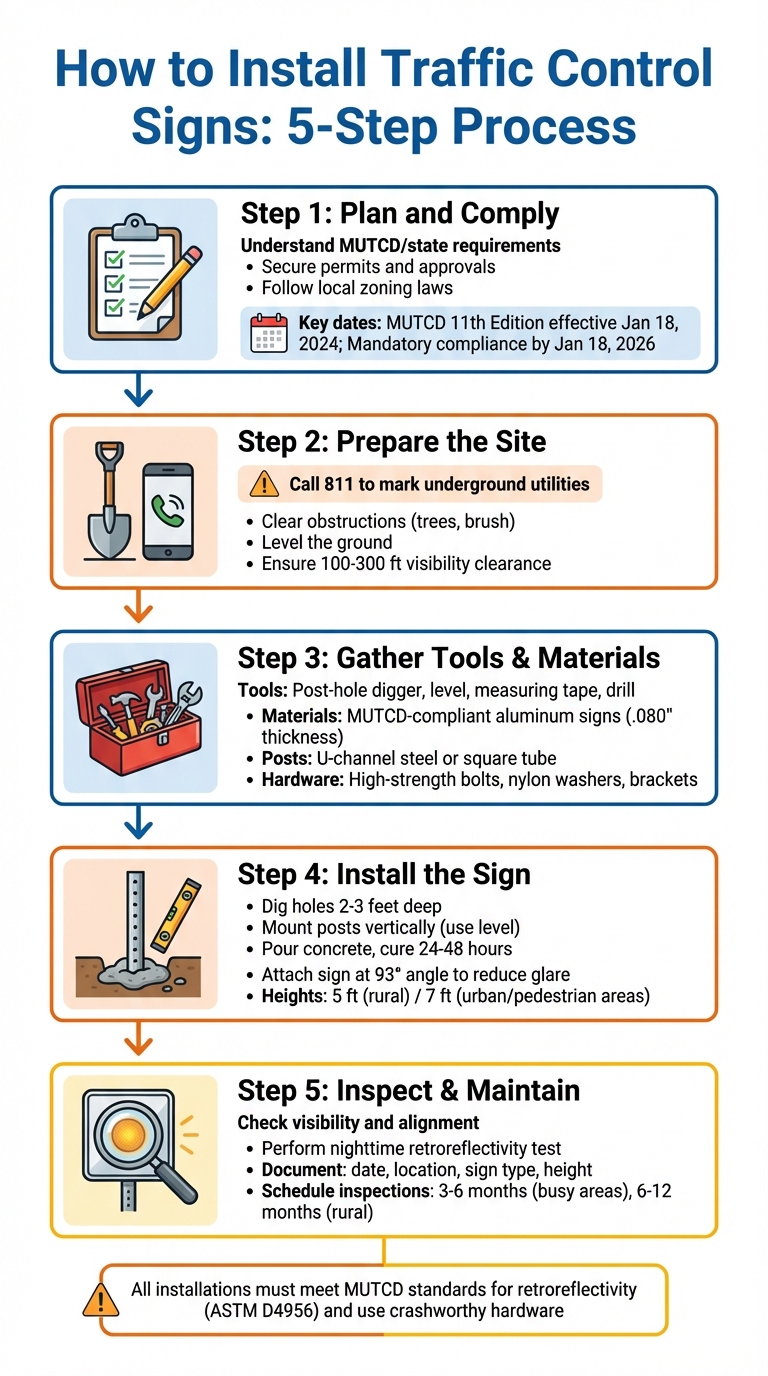
Here’s a quick breakdown of the process:
- Plan and comply: Understand MUTCD/state requirements, secure permits, and follow local zoning laws.
- Prepare the site: Call 811 to check for underground utilities and clear obstructions.
- Gather tools and materials: Use tools like post-hole diggers, levels, and compliant aluminum signs with retroreflective sheeting.
- Install the sign: Dig holes, mount posts securely, and align signs at proper heights and angles.
- Inspect and maintain: Ensure visibility, check retroreflectivity, and document installations for future upkeep.
Whether installing signs on public roads, parking lots, or work zones, following MUTCD standards ensures safety, compliance, and reduced liability.
5-Step Traffic Control Sign Installation Process
Planning and Compliance Before Installation
Understanding MUTCD and State Requirements
The Manual on Uniform Traffic Control Devices (MUTCD) sets the national standard for traffic control devices across the United States. Published by the Federal Highway Administration (FHWA) under 23 CFR Part 655, Subpart F, the MUTCD ensures uniformity in traffic signs and signals nationwide. The 11th Edition became effective on January 18, 2024, and states must adopt either the National MUTCD or a state-specific version that aligns with it by January 18, 2026. For instance, Texas adopted the 2025 TMUTCD on November 13, 2025, with an effective date of January 18, 2026.
The MUTCD applies to all public roads, including streets, highways, pedestrian and bicycle pathways, and private roads open to public travel. Each type of traffic sign has specific requirements for its shape, color, and dimensions. For example, STOP signs must always be octagonal, while warning signs are diamond-shaped. Mounting heights also vary: rural areas typically require a height of 5 feet, while business, commercial, or residential areas with pedestrians or parking require a minimum height of 7 feet. It’s crucial to check your state’s Department of Transportation (DOT) supplements, as they may include additional requirements beyond federal standards.
For nighttime visibility, signs must be retroreflective or illuminated and meet ASTM D4956 specifications for sheeting materials. Ground-mounted signs installed within the clear zone - a roadside area designed for vehicle safety - must use breakaway, yielding, or shielded supports.
Once MUTCD compliance is addressed, the next step involves securing permits and ensuring proper site access.
Getting Permits and Site Access
Before installation, confirm that all necessary permits and site access permissions are in place. Requirements differ significantly between public roads and private property. For public roads, only government authorities or approved contractors with proper authorization can install signs. Unauthorized installations can lead to fines and penalties. In some jurisdictions, like San Marino, California, stop sign installations require city council approval based on visibility studies and accident data.
On private property, such as parking lots or gated communities, property owners have more leeway but still need to follow local zoning laws and MUTCD standards for size, color, and retroreflectivity. Zoning ordinances often regulate factors like sign size, lighting intensity, and placement near property lines. Additionally, areas with special designations - such as historic districts, coastal zones, or scenic byways - might require extra permits or a Certificate of Appropriateness.
Before any digging, remember to call 811 to have underground utilities marked. Ensure your permit application includes all required documentation, such as a scaled site plan, sign dimensions, material specifications, and lighting details. For larger signs (exceeding 100 square feet), structural calculations from a licensed engineer may be necessary, and illuminated signs often require separate electrical permits.
Selecting TrafficSafetyHQ Signs and Materials
Once permits and approvals are secured, it’s time to choose signs and materials that meet MUTCD standards and offer durability. TrafficSafetyHQ produces MUTCD-compliant aluminum signs made from sturdy .080" aluminum and 3M™ reflective sheeting. These signs are built for long-term outdoor use, meeting both FHWA and ASTM D4956 standards. With pre-drilled mounting holes and a 10-year durability guarantee, they’re a reliable choice for various applications.
TrafficSafetyHQ’s product range includes parking lot signs (visitor, reserved, no parking, ADA-compliant handicap), roadway regulatory signs, pedestrian crossing signs, and truck route signs - all at competitive prices. Reflective sheeting options include 3M™ High Intensity Prismatic and Diamond Grade materials, designed to meet the MUTCD's retroreflectivity requirements. For example, white-on-green post-mounted signs must maintain retroreflectivity levels of W ≥ 120 and G ≥ 15 (measured in cd/lx/m²).
Additionally, TrafficSafetyHQ offers custom signage options that allow for logos or specific text while maintaining compliance with MUTCD standards. For government and commercial buyers, they provide Net-30 payment terms and tax-exempt checkout options, making the purchasing process straightforward and efficient.
Installing Traffic Signs for Parking Lots
Required Tools and Materials
Once you've completed the planning phase and secured the necessary permits, it's time to gather the tools and materials you'll need for a proper and compliant installation.
Basic Installation Tools
Start with a post-hole digger and post driver to create stable foundations, ensuring they are 2–3 feet deep to meet MUTCD height and alignment standards. A level is essential to keep the posts straight, while a measuring tape helps confirm the correct mounting heights - typically 5 feet in rural areas and 7 feet in pedestrian zones.
To fasten components securely, keep tools like a drill, spanners, and wrenches on hand. For larger projects or signs mounted at higher elevations, you may need additional equipment such as ladders, scaffolding, or even bucket trucks.
Sign Materials and Post Types
For long-lasting installations, aluminum signs are the go-to choice. They are durable, resistant to rust, and adhere to ASTM D4956 standards for retroreflective sheeting.
When it comes to posts, U-channel steel posts are a cost-effective option. These typically weigh about 3 pounds per foot and meet breakaway safety requirements without needing extra hardware. If you need higher load capacity or plan to attach multiple signs, square tube posts (1.5 to 2.5 inches) are a better choice. These allow mounting on all four sides and are perfect for setups requiring right-angle attachments. For wooden posts (4x4), bury them 30–36 inches deep. Steel posts, on the other hand, should not be buried deeper than 3.5 feet. This makes replacement easier if they are damaged. Avoid encasing steel posts in concrete when driving them directly into the ground, as it complicates removal.
Hardware for Mounting Signs
To securely mount signs, use hardware that meets federal crashworthiness standards. High-strength bolts are essential and should match your chosen post type. Place nylon washers between the bolt head and the sign face to protect the retroreflective sheeting from scratches or damage. For added support on the back of the sign, include metal washers.
Select brackets that correspond to your post type: U-channel brackets for steel U-posts and clamp-style hardware for square tube posts. In areas prone to vandalism, consider tamper-resistant nuts to deter unauthorized removal of regulatory signs. All mounting hardware should allow the sign to break away or yield upon impact, reducing potential damage to vehicles and minimizing the risk of injury to occupants. Lastly, seal the open ends of posts with sign post caps (either plastic or metal) to prevent water, debris, or insects from causing internal damage.
Site Preparation and Sign Placement
Evaluating the Installation Location
Before installing any sign, carefully assess the site to ensure drivers can clearly see it. Look for obstructions such as trees, overgrown brush, parked vehicles, or dips in the road that might block the sign from view. The sign should be visible both during the day and at night, giving drivers enough time - typically between 5.5 and 8 seconds - to read and react.
Place regulatory signs as close as possible to the area where the regulation applies, ideally at or near the controlled intersection. If the site doesn’t allow for optimal placement, consider installing an “Ahead” warning sign in advance of the location. Always rely on engineering judgment to determine whether a sign is necessary.
When placing signs within the clear zone of the National Highway System, ensure the location is crashworthy to minimize risks. Avoid mounting signs back-to-back if one of them has a unique shape - like a STOP sign - that could be obscured.
Setting Sign Height and Position
Once the location is evaluated, the next step is to determine the proper mounting height and position to maximize visibility. In rural areas, the bottom of the sign must be at least 5 feet above the edge of the pavement. In business, commercial, or residential areas where parking or pedestrian traffic is common, the minimum height increases to 7 feet. For signs mounted over sidewalks, maintain at least 7 feet of vertical clearance to accommodate pedestrian movement. Always place signs on the right-hand side of the road to align with a driver’s natural line of sight.
| Location Type | Minimum Mounting Height | Notes |
|---|---|---|
| Rural Areas | 5 feet | Measured from the bottom of the sign to the pavement edge |
| Urban/Business/Residential | 7 feet | Applies where parking or pedestrian activity exists |
| Above Sidewalks | 7 feet | Ensures pedestrians can pass underneath |
| Secondary Signs | 4 or 6 feet | Positioned 1 foot below the primary sign minimum |
To avoid overwhelming drivers, space signs at least 200 feet apart, ensuring there’s enough time to read and process each message. When replacing an old sign, double-check the mounting height and lateral offset to confirm they meet current MUTCD standards.
Aligning Signs for Maximum Visibility
Proper alignment is key to ensuring signs are easy to read. Position the sign face at a 93-degree angle to the roadway to reduce glare. This slight adjustment prevents specular glare, which occurs when sunlight or headlights reflect directly off the sign, making the text difficult to read.
"To avoid the occurrence of specular glare, signs should be positioned slightly more than perpendicular to the roadway (93 degrees is recommended by sheeting manufacturers)." - Federal Highway Administration
Additionally, ensure the sign is either retroreflective or illuminated so it maintains the same color and shape visibility during both day and night. Keep in mind that general street or highway lighting does not meet MUTCD illumination requirements.
With the site prepared and the alignment finalized, you can move on to the actual installation process.
sbb-itb-5d58da3
Installation Steps
Step 1: Verify Sign Specifications and Mark Locations
Start by confirming the sign's MUTCD specifications. For example, STOP signs typically measure 30 x 30 inches on conventional roads, 36 x 36 inches on expressways, and 48 x 48 inches on freeways. Speed limit signs are usually 24 x 30 inches on conventional roads and 48 x 60 inches on freeways. Once the specifications are verified, use a tape measure and stakes to mark the exact post location. Regulatory signs should be placed where the rule applies, with STOP and YIELD signs positioned as close to the intersection as possible. If there’s a marked crosswalk, install the sign just before the crosswalk line closest to approaching traffic. Be sure to consider physical and traffic-related factors when determining the placement. Once the locations are marked, you’re ready to prepare the site.
Step 2: Contact 811 and Prepare the Site
Before digging, call 811 to have underground utilities marked. This step is essential to avoid hitting buried cables, conduits, or pipes, which could be both dangerous and expensive. Wait until the utility markings are complete before proceeding. Once cleared, remove any obstacles from the installation area and level the ground to ensure the post will stand straight. Trim any nearby branches or vegetation that could block the sign from being visible at a distance of 100 to 300 feet, depending on the road’s speed limit.
Step 3: Dig Holes and Install Posts
Dig a hole 2 to 3 feet deep, slightly wider than the post diameter, to leave room for concrete or backfill material. Place the post in the center and use a level to ensure it’s perfectly vertical. For permanent installations, fill the hole with concrete and allow it to cure for 24 to 48 hours before attaching the sign. During curing, periodically check the post’s alignment and make adjustments as needed before the concrete sets. If the sign is temporary or frequently replaced, consider using systems like V-Lock or Lock-Socket to avoid repeated digging.
Step 4: Attach the Sign
Once the concrete has fully cured, align the sign’s pre-drilled holes with the post or mounting brackets. Secure the sign using bolts and position it at a 93-degree angle to reduce glare from sunlight or headlights. Tighten all hardware and check that the sign is stable. To protect against rain, dust, and insects, install a post cap, which helps prevent internal corrosion. With the sign securely mounted, you’re ready for the final inspection.
Step 5: Inspect and Record the Installation
Conduct a thorough inspection to ensure the sign meets MUTCD visibility and safety standards. Check that it’s at the correct height, properly aligned, and free from obstructions. Perform a nighttime inspection from a moving vehicle to confirm the sign’s retroreflectivity is sufficient under headlights. Record the installation details, including the date, location, sign type, and mounting height. This documentation is vital for future maintenance and compliance tracking. Plan routine inspections - every 3 to 6 months in busy areas and every 6 to 12 months in rural zones - to look for loose bolts, fading reflectivity, or damage. Don’t forget to clean the sign face immediately after installation to ensure maximum visibility.
Installation for Different Locations
Different locations require specific installation methods to ensure safety and compliance. Here's how to handle installations effectively for various settings.
Parking Lots and Private Property
The MUTCD applies to parking lots "open to public travel", such as those at shopping centers, airports, and sports arenas. Signs should be installed 7–8 feet above ground to remain visible over parked cars and ensure pedestrian safety. For ADA compliance, there must be at least one accessible parking space for every 25 regular spaces (up to 100 total), and one van-accessible space for every six accessible spaces. Use color-coded signs: blue and white for handicap parking, red and white for no parking zones, and green and white for time-restricted parking. Main text should be in uppercase letters at least 6 inches tall, with secondary text no smaller than 4.5 inches. Reflective aluminum signs with pre-drilled mounting holes, like those from TrafficSafetyHQ, simplify installation while meeting MUTCD standards. Place signs where drivers can easily see them, such as before intersections or turns within the lot.
Roadway Regulatory Signs
Starting January 18, 2024, MUTCD 11th Edition standards require all regulatory, warning, and guide signs to follow specific shapes and visibility guidelines. For example, STOP signs must be octagonal, YIELD signs triangular (point down), and warning signs diamond-shaped. All signs must be retroreflective or illuminated to ensure visibility both day and night. Sizes vary by road type - freeway STOP signs should be 48 x 48 inches, while conventional road STOP signs are 30 x 30 inches. Retroreflectivity must be verified using one of five approved methods: visual nighttime inspection, measured retroreflectivity, expected sign life, blanket replacement, or control signs. Additionally, roadside hardware like sign supports must be crashworthy, designed to break away or yield upon impact.
Construction and Work Zones
Temporary traffic control (TTC) zones are divided into four areas: Advanced Warning (to alert drivers), Transition Area (to redirect traffic), Activity Area (where work occurs), and Termination Area (to return traffic to normal). For short-term projects (less than three days), use portable sign supports. For longer durations, use post-mounted signs. Sign spacing depends on the roadway type: in urban areas, spacing should be 4–8 times the speed limit, while in rural areas, it should be 8–12 times the speed limit. High-speed roads (35 mph or higher) require 48 x 48-inch signs with 7-inch lettering, while moderate-speed roads (25–35 mph) need 36 x 36-inch signs with 5-inch lettering. Mount portable signs at least 1 foot above the ground, and use sandbags - not concrete or rocks - for ballasting. Replace faded signs promptly to avoid driver confusion and maintain safety. Always include an "END ROAD WORK" sign or a Speed Limit sign to signal drivers that normal conditions have resumed.
Conclusion
Installing traffic control signs the right way demands careful planning and strict adherence to MUTCD standards. The process starts with understanding both federal and state regulations, obtaining the necessary permits, and choosing materials that meet compliance standards. From there, it’s all about preparation: ensuring the site is ready, setting the proper height and angle for the sign, and using crashworthy hardware to secure it. Every step matters - from calling 811 to check for underground utilities before digging to thoroughly documenting the installation process - for both safety and legal compliance.
When it comes to traffic control, MUTCD compliance isn’t just a recommendation - it’s essential. The MUTCD applies to all public roads, bikeways, and private roads accessible to public travel. As the FHWA explains:
"The MUTCD defines the standards used by road managers nationwide to install and maintain traffic control devices on all streets, highways, pedestrian and bicycle facilities, and site roadways open to public travel".
Following these guidelines ensures your signs serve their purpose effectively. They must meet critical benchmarks: addressing specific needs, commanding attention, clearly communicating their message, earning the trust of road users, and allowing adequate time for drivers to respond. Compliance also ensures signs meet retroreflectivity requirements for nighttime visibility, use standardized shapes and colors for quick recognition, and incorporate crashworthy supports to minimize injury during impacts. Ignoring these standards can lead to driver confusion and potential liability - especially on private property, where courts may hold you accountable for accidents caused by non-compliant signage.
Choosing high-quality materials is another key factor. Using certified, durable materials not only ensures compliance but also reduces long-term costs. Whether you’re installing parking lot signs, regulatory roadway signs, or temporary work zone signs, starting with the right materials minimizes maintenance and replacement expenses.
To maintain compliance and safety over time, regularly assess your signs using one of the five approved methods: Visual Nighttime Inspection, Measured Sign Retroreflectivity, Expected Sign Life, Blanket Replacement, or Control Signs. Promptly replace any faded or damaged signs to keep them effective and compliant. These ongoing efforts are vital for ensuring your traffic control signs remain reliable and safe for years to come.
FAQs
What happens if traffic signs aren't installed according to MUTCD standards?
Failing to comply with MUTCD standards isn’t just a minor oversight - it can lead to serious problems. It increases the likelihood of accidents, puts public safety at risk, and could leave you facing legal issues. On top of that, non-compliance might cost you federal funding for specific projects.
To avoid these risks, it’s crucial to follow these guidelines carefully when installing and maintaining traffic control signs. Safety and legality depend on it.
How can I keep my traffic signs reflective and visible over time?
To ensure your traffic signs remain reflective and easy to see, make it a habit to regularly inspect their retroreflectivity. Use the MUTCD guidelines to pinpoint any signs that no longer meet visibility standards and replace them promptly.
Keep in mind that factors like harsh weather and UV exposure can wear down a sign’s materials over time. By staying ahead of these issues and addressing damaged or faded signs, you not only stay compliant but also help enhance road safety.
What do I need to do to get a permit for installing traffic signs on private property?
To get the necessary permit for putting up traffic signs on private property, your first step is to reach out to your local government office. They'll provide details on the specific requirements you need to meet. Generally, this involves submitting an application along with key documents like construction drawings, site plans, and information about the sign's size and location. Be sure to check zoning laws and any rules concerning electrical components if your sign uses them.
Once you've gathered all the required paperwork, submit it for review. Wait for the official approval before moving forward with the installation. Following these guidelines helps you stay within the law and avoid fines or unnecessary delays.